
Home Renovation Update: How we Added $400k+ in Value to our Marco Island Florida Beach House
- kelsey

- Sep 19, 2021
- 8 min read
Updated: Sep 14, 2025

Hello there! It seems like it's been forever since my last blog post. We have been so busy over the last few months traveling between our homes in Ohio and Florida. I have also been really focusing on creating content for my Instagram, and to be honest, the writers' block has been real. But now I'm back and so excited to share what I've been up to with you!
From July 5th to August 3rd, we completely transformed the beach house, and I am so proud of us! The house has three bedrooms and two full bathrooms. When you first walk in the front door, you are greeted by a huge open concept living area, kitchen, and dining room. The two guest bedrooms and bathroom are down a hallway, and the owner's suite is just off the living room. In the back, there is a gorgeous pool area surrounded by a lush hedge of coco plumb bushes, creating a natural privacy wall. Since this house used to be a rental home, it had seen better days, and there was a lot of work to do. All of the walls needed to be repaired and repainted. Most of the furniture and decorations were old and outdated, so they needed to go. It was clear that the previous owners had never really cleaned the house properly, so a deep cleaning was also in order. At first, this all seemed a bit overwhelming, but I knew B and I would be able to get it done!


We decided to take the project room by room and set a schedule for ourselves to ensure everything was done within a month, but also so we could still enjoy the island life while we were working. Every day (Monday-Friday) we would start work at around 9am and aim to be finished by 3pm. Each room took us about 2-3 days to finish completely. On the days I wasn’t able to help B with projects, I would go furniture and decor shopping while he worked. It was so much fun to search the island for local art and handmade furniture, or go to the nearby city of Naples to find the best deals. After working we would swim in the pool, enjoy some dinner, take the dogs for a walk in the park that is at the end of our street, then shop online for whatever furniture, appliances, or decorations we wanted to order for the room we had been working on.
Before getting into any of the hard physical work, I first had to come up with a color scheme and design concept for the house. When we first arrived, the decor was, to put it as politely as possible, a hot mess. We jokingly referred to it as "Karen-ized" (think tacky "live laugh love" style cheap beach decor). Luckily we were able to donate most of the old decor and furniture to a local charity shop. My vision for the home was to make it feel like you were walking into your own private resort/villa. An island home without it being too obvious. With touches of British colonial, French Polynesian, bohemian, and old money Florida styles. Incorporating some of the beautiful dark wood furniture that was already in the home, with gold accents and bright tropical colors. We knew that we wanted the house to feel inviting and lived in, while maintaining a level of sophistication. Modern, but with an old-world charm. Definitely lots of greenery too. Because Marco Island is known for having the most beautiful beaches in mainland America, we wanted the color pallet to reflect the colors you would see at the beach. Shell white, and shades of ocean blues and greens. I made several design mood boards and carried the paint samples with me while shopping, so I wouldn't lose sight of the vision.

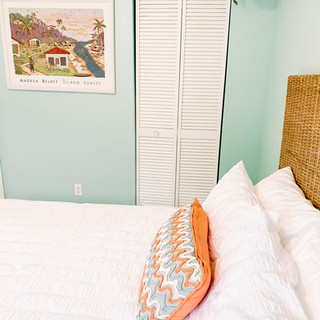
The first room we tackled was the owner's suite (bedroom and bathroom). In this room, like all the others, we began by removing the furniture. Then we cleaned the walls and floors. B repaired the many holes and cracks in the dry wall, we sanded the walls, and cleaned them again. Next, we painted the walls. In this room, we chose a soothing pale sage/seafoam green color. The walls really absorbed the paint and it went on nice and thick, so we only had to apply two coats. Once the wall paint was dry, we taped off the trim, repaired the dings and dents with wood putty, and repainted it with two coats of paint. Then we cleaned again. Finally, I was able to stage the room with the furniture and decorations I had found. The dark wood California king size bed is the focal point in this room, and we decided to assimilate intricate carved dark wood throughout the house.
My favorite pieces in this room are the two bedside tables that I found at a local home design store. They are antiques that had been refurbished and include a design that was very prevalent in the homes here during the 60s and 70s when the Island was first being developed. The white wood adds a nice contrast to the dark wood, and I was able to find decorative pillows that are the same color as the background behind the design, as well as having a very similar pattern. It is important to add cohesive patterns like this this around the entire house, especially if it is an open concept home, to tie the house together in a visually pleasing way. You will also find similar style patterns on the living room console table, and in smaller decor throughout the house.


B had a vision for the artwork above the bed, and wanted simple palm leaf designs. The pictures are just small posters we found on Amazon and put in Gold frames we found at Michaels! (you can shop everything mentioned in this post by clicking here, or following the links provided at the end of the post). We replaced the mirror frame in the bathroom with a frame I custom-designed online.
We repeated this process in the living room, kitchen/dining room, laundry room, hallway, guest bedrooms, and bathroom.


The first guest room is very feminine with light blue/grey walls, wicker furniture, soft touches of pink, and a white shaggy rug.

The original bed in this room was the perfect size and shape for the room. However, it was extremely outdated and just not the vibe. I was struggling with what I wanted to do with it, and we were running out of time. On one of my decor shopping excursions, I came across some beautiful gold upholstery buttons and that's when it hit me "I'll just make it look how I want myself!" Neither of us had ever reupholstered anything before, but I found some fabric and we just sort of figured it out as we went. Using a staple gun to tightly secure the new fabric over the existing head and footboards, then hammering the upholstery buttons into the places where there had been indentations before. For our first time doing something like this, I am extremely pleased with how it turned out! This saved us a lot of money ($50 for the fabric and buttons as opposed to hundreds for a new bed) and we now have a completely original furniture piece. One of my absolute rules while designing is "If it's not perfect, don't buy it." The wrong piece can completely disrupt the design and take you off course from the vision. This applies to both large and small purchases. I have often found if I am just patient, I will come across exactly what I had in mind. You cannot rush perfection. This also helps you cut down on unnecessary costs and wasting your time making returns or exchanges.


Before, during, and after.


The second guest room overlooks the pool so we painted it a similar color to the pool water so that it would have an indoor/outdoor flow. The decor in this room is "boho" and I love the tiny turtle sculptures we found to pay homage to the sea turtles that call the Island home. This room is the smallest bedroom and was the easiest to paint, and was the least beat up. All it took was some new furniture and some tlc to really transform the space. The pretty Caribbean scene painting we found buried in the closet but it works beautifully in this room.


Before, during, and after


I was so happy when we got to the guest bathroom. The original colors were horrible and did not do the space justice. The walls were lemon yellow, with pale blue shelving. The focal point of this room is the beautiful sea glass-inspired tile around the tub, and the yellow color did not compliment it or even remotely match it at all. We chose a blue color that was present in the tile, but also tied the two guest bedrooms together. It also complimented the white marble sink much better. The shelves and mirror were fine, they just needed some TLC. So, I spray painted them white and they ended up being perfect.


Because the open concept living room/kitchen/dining room is the first thing you see when you walk into the house, I wanted to make sure it made a big impression. We decided to paint the walls white to emphasize the high ceilings and light airiness of the space. White walls would also help all the bright tropical-colored accents and greenery pop. Lots of blankets and throws on the sectional couch help keep the space cozy.


B lived in Florida for almost a decade before we met and has always loved old Florida-style homes. Typically in these style homes, the large open area between the tops of the cabinets in the kitchen and vaulted ceiling are decorated. We did the same in this house with greenery, flowers, and decorations. We also found an old map of the island at the Marco Island Historical Museum and had it framed for an interesting and unique art piece.

I am so obsessed with the beaded chandelier we installed over the dining room table.

Another simple way to quickly and inexpensively add hundreds of dollars in value to a home is to make sure all the light switches and outlets match. Nothing drives me crazier than a house with different colored switches and outlet covers! All the switches and outlets in this house were outdated, dirty, and about 50 shades of different beiges. We got new white switches and covers for every single one. I am so glad we did because while replacing them B found that they had all pretty much been wired incorrectly and had to redo all of the wiring. There was also an old security system that had not been used in years and wasn't even attached to the electricity. We ripped that out and repaired the hole in the wall it left behind.
After a brief trip back to Ohio to check on our house and business there, we are back on Marco Island to add some finishing touches. Today we are painting the last of the quarter round to finish the floor. Adding quarter round to the floor molding helps seal the house and adds another level to the overall design. We will be repainting the ceilings and replacing the vanity and light fixtures in the owner's suite bathroom. Yesterday we replaced the rugs in the dining and sitting areas on the back lanai. Eventually, we will retile the pool and repaint the cabinets in the kitchen. For now, we are enjoying the house before we return to Ohio for the beautiful fall weather there.


All of our hard work, combined with the fact that the house was purchased for an absolute steal (because of all the work it needed), allowed us to increase the value of the home by a little over $400,000. Because we did everything ourselves, we only spent about $11,000 on the entire renovation and re-design. We also bought it at the right time before the housing market blew up in South Florida with everyone buying homes here due to COVID. A home is an investment and it definitely pays to take care of it properly, do your research before buying, and enjoy it to the fullest while living there. I hope to be able to share more improvements we do here, as well as in Ohio soon, and promise there won't be so much time between posts.
Below are the links for my Liketoknow.it page where you can shop everything mentioned in the blog, and the local stores where we found artwork and furniture. If you like you can follow me on Instagram for more lifestyle inspiration @_sincerelylovely


Comments